It's a Minecraft Birthday Party!!
I don't know about your household, but ours is obsessed with Minecraft. So, for R's 9th birthday, I knew we had to go with a Minecraft theme.
Decorations:
I started bringing home boxes of any shape and size. I had a general idea of what I wanted to do, but knew I would need all sorts of boxes to pull it off. My first project was torches.
I had 1 box the exact size/shape I wanted, so I went off those measurements and made 2 more. Then, I covered them with brown and yellow paper.
I was happy with the final result, and ended up attaching them to the wall with some Command Velcro strips.
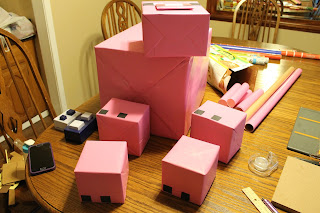
My next project was a pig. Luckily, Minecraft is all squares, and requires no actual artistic talent! I chose the boxes I thought I would need and went to work. I covered each
box with pink wrapping paper I picked up at a dollar store. I only
needed 1 roll, so with the free boxes, it was a really cheap project.
After covering all the boxes, I chose the colored paper for the pig's face. I used to do a lot of scrapbooking, so I had paper and square punches on hand. I used a 2" punch for this.
I also punched out squares for the pig's toes. Two squares of black paper per foot.
The last thing to do was put it all together. I used hot glue for this, although the head did start to lean forward, almost as if he were dozing.
The day of the party, I put a piece of clear tape on the back of his head and attached it to the body.
Next up, was the giant Steve. Now, I realize the head to body proportion is off on this, but I was running out of boxes and decided to just go with it.
For the arms, I used soda boxes. Again, the size isn't quite right, but I thought it was a good enough fit.
I covered the arms with brownish craft tissue paper.
Next, I did the torso. I couldn't find any wrapping paper for the teal colored shirt that Steve wears, but I did find a plastic tablecloth, so that's what I used.
Then, I moved on to his pants. I didn't feel the need to separate the legs or shoes on Steve. When you look at his character straight on, you don't see any separation, and since this Steve was not going to be mobile, I figured it would be alright. It's a personal choice.
For the shoes, I used silver tissue paper, folded in half, length-wise.
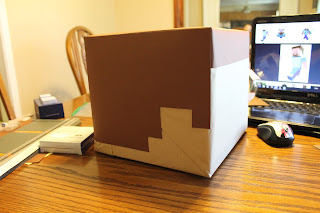
Next, was the head. It was the most time consuming, but as I've said before, everything in Minecraft is squares, so I found the head extremely easy to copy.
First, I wrapped the head in the brown craft tissue paper. Then, I used brown scrapbook paper to cover the top and 2" down on the front of his face. Next, I just looked at a picture of his face online to see the dimensions for the sides of his head, and then cut that out and
traced the same pattern on another sheet of brown paper, for the opposite side of his head. If you're not that concerned with accuracy, then you could just eyeball the measurements. For the back of the head, I used another piece of brown paper, and made it the same height as the side pieces.
For the actual face, I used brown, blue and white scrapbook paper. Using the square paper punch made it a breeze.
I attached the face with some double sided tape,easily found just about anywhere. After the face was complete, I attached the head to the body with hot glue.
To complete the look, I added a small piece of brown craft paper under his chin, for that v-neck shirt that he wears, and a small piece of teal on the right side, because he's sloppy and doesn't tuck in his shirt.
Proportions aside, I thought it came out great! And, the kids liked it too. I guess that's what's important.
The last papercraft project I did, was a Dan TDM head. I googled an image of his character, and just punched out the appropriate colors with a 2" paper punch.
I used a glue stick to adhere it onto a piece of foam board. It's hard to mess up squares, so it turned out fantastic. I actually posted this to my
Instagram account, and tagged Dan in it, and he ended up liking it! Or, one of his minions liked it for him. Either way, R thought it was the coolest and insists that they're best friends now.
Some other decorations you can see below. I wanted to use up the rest of my box stash, so I covered them in various Minecrafty patterns.
I found some contact paper at the dollar store that looked very similar to cobblestone. They also had a wood grain one, that worked out great for wooden planks. Another very cheap project.
You can see a Steve head on the table in the picture above. This was another printable and only required a little elbow grease. Another great hit, with the kids...and maybe myself too.
I found these awesome Minecraft balloons on ebay. There were all the important faces, so I thought it was a steal at $4.25 for 28 balloons.
We also had a Creeper toss game, with little bean bags.
A "Nether Portal" made of black and purple streamers.
Swords on foam board. We printed these and attached them to foam board, then cut them out. A little time consuming, but well worth it.
The final decoration, was a creeper face, made of paper plates. This looks easy enough, but turned out to be a little tricky. I originally started by simply taping the plates together with duct tape. However, this eventually started to come apart, so other options were explored. In the end, we cut strips of poster board and stapled them together in a grid pattern. Then, the plates were hot glued to the grid. I attached the whole thing to the wall with Command strips. Life savers, those are.
Next up: Minecraft Party Goody Bags!


